They say you can’t judge a book by its cover, but I must admit to being a complete sucker for beer poured from a sparkling-wine bottle. Uncorking a 750 ml bottle of saison, lambic, or imperial stout just feels_ special, _and truth be told, I would probably award industrial macro-brews extra points on the Unfiltered beer app if I could open them with such fanfare.
We homebrewers often encourage one another to take up kegging as the next logical step toward pouring the perfect pint. But even if you keg most of your beer, some occasions simply call for bottles. Whether you want to submit to a competition, offer homebrew as a gift, or simply stash a few beers in the trunk to enjoy after a hike, bottles let your beer go anywhere. Here are three steps you can take to step up your bottling game.
1. Carbonate to Style
Formulating your own recipes is an enjoyable part of homebrewing, but sometimes you don’t want to think too hard: You just want to get some beer into the pipeline. That’s why novice and advanced homebrewers alike appreciate the convenience of beer kits.
Those prepackaged kits usually include little premeasured bags of priming sugar, and—in most cases—said bags contain 5 ounces (142 grams) of corn sugar. This carbonates 5 gallons (19 liters) of beer to about 2.5 to 2.7 volumes (5.0 to 5.4 grams per liter), which is a good all-purpose level of fizz if you don’t have a good reason to do otherwise.
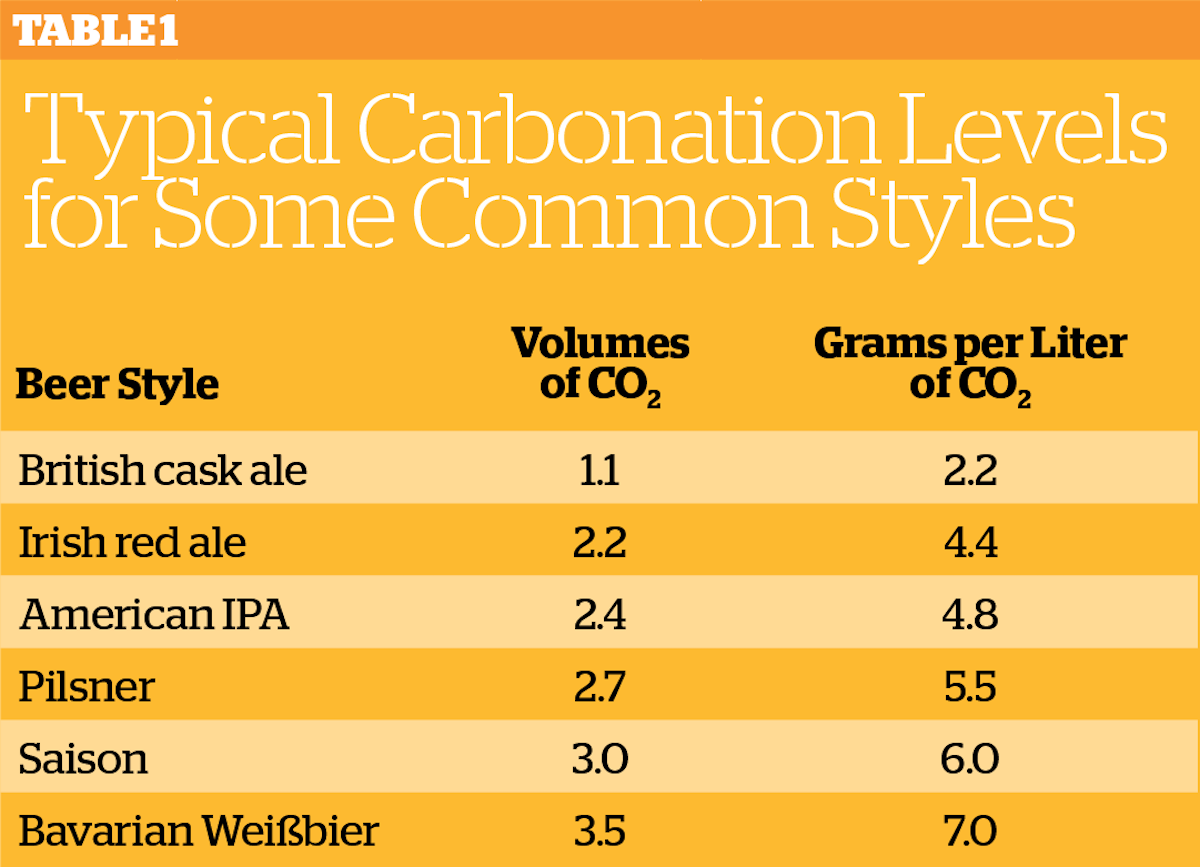
But there is a very good reason to do otherwise: Different beer styles taste best at different carbonation levels (see Table 1, below). British cask ales might barely breach 1 volume (2 grams per liter), while some Belgian styles approach 4 volumes (8 grams per liter) of CO2 or more.
It’s not just a matter of numbers. Carbon dioxide reacts with water to create carbonic acid, which is what gives tongue-tingling life to effervescent beverages. That carbonic bite plays an important role in our perception of the malt, hops, esters, and phenols that lie within.
Achieving a precise level of dissolved carbon dioxide is easy when you force carbonate in a keg: Just set the regulator pressure according to the serving temperature for your desired level of fizz. You can even adjust it as you empty the keg. But doing it right in bottles takes a deft hand.
Detailed calculations are best left to brewing software, and I highly recommend taking the time to get to know BeerSmith, Brewer’s Friend, or one of the many other programs that do all of the math for you. But, roughly speaking, fermented beer already contains about 0.8 to 1.0 volumes of carbon dioxide from fermentation itself. The warmer the beer gets, the less CO2 remains in solution when you go to bottle, but assuming 0.8 to 1.0 volumes to start will get you in the ballpark.
Then, for each additional volume of carbon dioxide, you need to add about two gravity points (1.002) worth of fermentable sugar. One ounce (28 grams) of corn sugar per gallon (3.8 liters) of beer contributes about three gravity points, ergo a priming rate of 5 ounces of sugar per 5 gallons yields an additional 1.5 volumes of carbon dioxide, giving roughly 2.5 volumes total when added to what’s already there. If you wanted to carbonate to 2 volumes instead of 2.5, then you’d adjust the amount of corn sugar proportionally to add just 1 volume on top of what’s already there.
But seriously, just get the brewing software.
2. Try Kräusening
Kräusening is a German technique in which carbonation is achieved by adding actively fermenting wort to finished beer before packaging. German brewers do it to remain compliant with the _Reinheitsgebot, _under which the addition of simple sugars is verboten. But there’s a good reason to try it as a homebrewer.
Just as making a starter helps ensure that you have a healthy population of yeast cells going into fermentation, adding fermenting wort to beer before packaging is a good way to ensure that the yeast cells you need for carbonation will be up to the task. This is especially helpful for high-gravity styles and lagers, in which the yeast cells that remain in solution after fermentation may be poor in health or low in number.
Introducing active yeast can also help reduce certain off-flavors such as diacetyl. Remember, yeast cells will often clean up after themselves if offered the chance. Kräusening is a way to give them that chance. Once again, the math is complex, and I strongly recommend spending some time with brewing software. But, here’s a very approximate and simple way to try your hand at it.
Prepare a 2.5-liter (2.6-quart) yeast starter using the golden rule of 100 grams (3.5 ounces) of dry malt extract for every liter of starter, so 250 grams (8.8 ounces). Inoculate it with fresh yeast, preferably the same strain that fermented the beer you want to carbonate, but don’t agitate it or place it on a stir plate. As soon as you see visible signs of fermentation in the starter, add the whole thing to the bottling bucket along with your beer, and bottle it. This will introduce enough active yeast and malt sugar to achieve roughly 2.5 volumes of carbon dioxide in a 5-gallon batch of beer, again assuming that there’s already about a volume in there.
Purists will recognize that isn’t technically Kräusening in the traditional sense because one would traditionally inoculate with wort of the same composition as the beer being bottled. This is simple to do in a commercial setting, where brewers make the same products day in and day out. But most homebrewers don’t have that luxury, which is why I recommend at least starting with a simplified technique to see whether you like it.
3. Corks, Cages, and Caps
Carbonating to style and Kräusening might make your beer taste better, but packaging in a fancy bottle will make it look better. And in my opinion, nothing beats a sparkling-wine bottle for the extra bit of class that makes ordinary beer look extraordinary. After all, check out what 750 ml bottles of beer sell for.
To package in sparkling-wine bottles, you’ll need
- Sparkling-wine bottles (obviously)
- Sparkling-wine corks
- Wire cages, sometimes called hoods or muselet
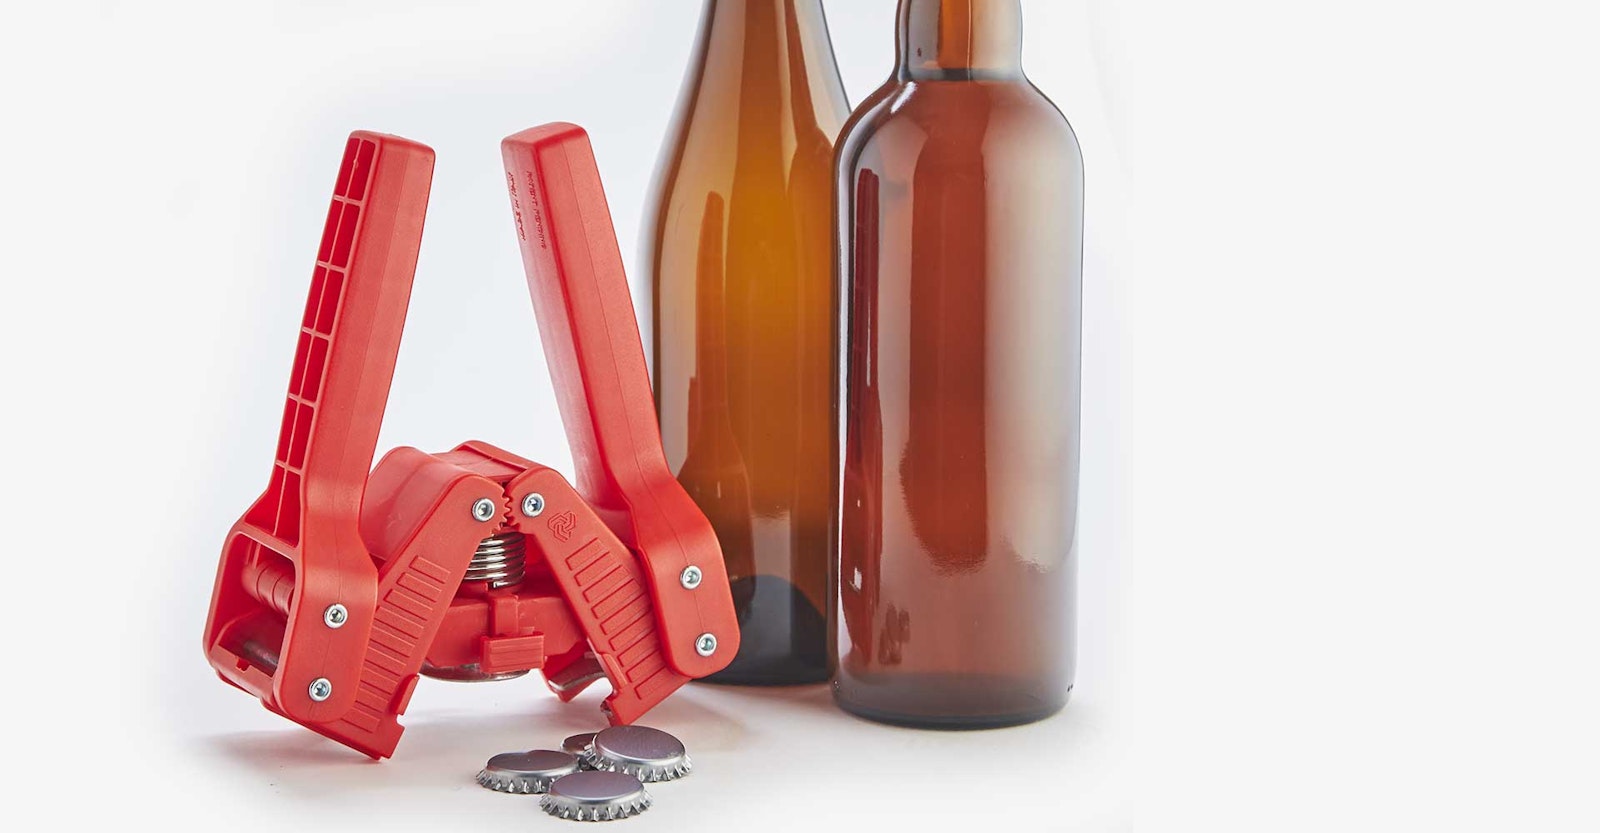
- A bench capper or floor corker
- A wire-cage tool or (my cheap solution) a chopstick or pencil
There are two types of sparkling-wine bottles, and they’re incompatible with one another. European sparkling-wine bottles, including those that hold authentic champagne, have a slightly larger opening (29 mm) than American sparkling-wine bottles (26 mm). As always, seek out brown bottles for their light-blocking properties, unless you have a particular affinity for lightstruck flavors.
You can, in fact, seal either type of bottle using a good old-fashioned crown cap, provided you purchase the right-size cap for the bottle (most homebrew stores sell both 26 mm and 29 mm caps). Some brewers cap sparkling-wine bottles using the same wing-type handheld capper that you’d use to seal any other beer bottle, but your mileage may vary. For stability, leverage, and speed, I like to use a bench capper.
If you’d like to seal those bottles with a cork, however, you’ll need a floor corker. Now, you can certainly buy a dedicated champagne floor corker if you prefer to use traditional Belgian-style corks, but there are two other solutions as well.
Plastic T-stoppers can be pushed in by hand, or you can use a regular bench capper to push them right into the neck with virtually no fuss. And plastic stoppers are reusable to boot. Sure, plastic lacks the elegance of cork, but not purchasing a special corking device makes up for it in my book.
The cages that secure the corks in place aren’t just traditional; they’re necessary to keep the cork from popping right off the top of the bottle as carbonation pressure builds. They’re easy install: Just place the cage on top of the cork and use a wire-cage tool, a chopstick, or even a pencil to turn the little wire. As the wire turns, the cage will tighten around the cork. Tradition dictates six half-turns, but what’s most important is that the bottom of the cage securely grabs the underside of the lip.
Packaging in Belgian bottles is similar to packaging in sparkling-wine bottles. There’s a bit of finesse required to keep just the right amount of cork above the neck, but if you already own a floor corker (if you’re a regular winemaker, say) you can bottle in Belgian bottles just as easily.
Another solution is to follow the lead of brewers like Cantillon and Fantôme, and cork the bottle with a standard wine cork before capping it. There’s no science that supports the benefit of this redundant closure method, but if evoking romantic notions of Brussels is your goal, there’s no better way. One added benefit of this method is the ability to use less-expensive wine corkers rather than the more expensive champagne corkers.
Keep in mind that competitions usually require regular 12-ounce longnecks, so if you plan to submit entries, you’ll want to bottle at least some of your batch in the conventional manner. But popping the top on an elegantly bottled 750 milliliters of homebrew instantly turns an ordinary evening into something memorable.
A Return to Basics
When I started homebrewing, I dreamed of owning a home-draft setup with on-demand kegged beer at the ready (and I eventually got it). But as I’ve progressed, I’ve come to appreciate the elegant simplicity that accompanies well-conditioned bottled beer. You can cellar it. You can give it away as gifts. And yes, you can even drink it while watching the game. Most importantly, you can take it anywhere.
Ultimately, it’s about taking that last step to pouring the perfect pint, whether it flies out of the business end of a stainless-steel faucet or gently gurgles from the mouth of a glass bottle. But once you figure out the bottling method that’s right for you, I guarantee that no amount of shiny stainless steel will ever quite compete.