
Whether they realize it or not, everyone who creates flavorful products keeps a mental model of every ingredient and process they use. This is what allows chefs, brewers, and others to do a kind of mental prototyping—visualizing the completed creation—and quickly imagine different options until they find the perfect combination.
Then it’s simply a matter of writing it down and, oh yeah, actually making it.
Modern science has demonstrated that it’s not only possible for humans to imagine flavors, it’s indispensable for certain pursuits, including ours. It turns out that imagining an aroma actually activates the brain in a pattern similar to experiencing it in real life. Not everyone is equally good at this; most people don’t even realize it’s possible. But it can be learned.
An important thing to know is that this kind of flavor visualization depends heavily on the quality of the model we maintain. To be accurate and detailed, our model needs information. Constant tasting—of everything—is the way we do this. The best brewers I know make this a habit, and it shows in their beers.
So, when it comes to malts, it would be easy to lump them all together into categories, such as black or 60° Lovibond caramel. Unfortunately, each producer’s version is different—often strikingly so—even at the same color level. Maltsters are a tricky and secretive bunch, and they have numerous levers they can pull to achieve different results by manipulating the Maillard browning and caramelization processes.
Hence, there really is no substitute for getting up close and personal with as many different malts as you can. At working breweries, team sensory notes on various malts should be just one more tool for the development of the next fabulous beer.
Evaluating Malt
The simplest way to evaluate all but the darkest malts is to just chew on them.
Human saliva contains a lot of amylase enzymes, a relatively recent evolutionary adaptation to our starchy agricultural diets. As these enzymes liquify the starch and turn it into sugar, aroma compounds volatilize. Because that happens inside the mouth, pay special attention to retronasal—the odor perception that occurs when you breathe gently out your nose after swallowing food or drink.
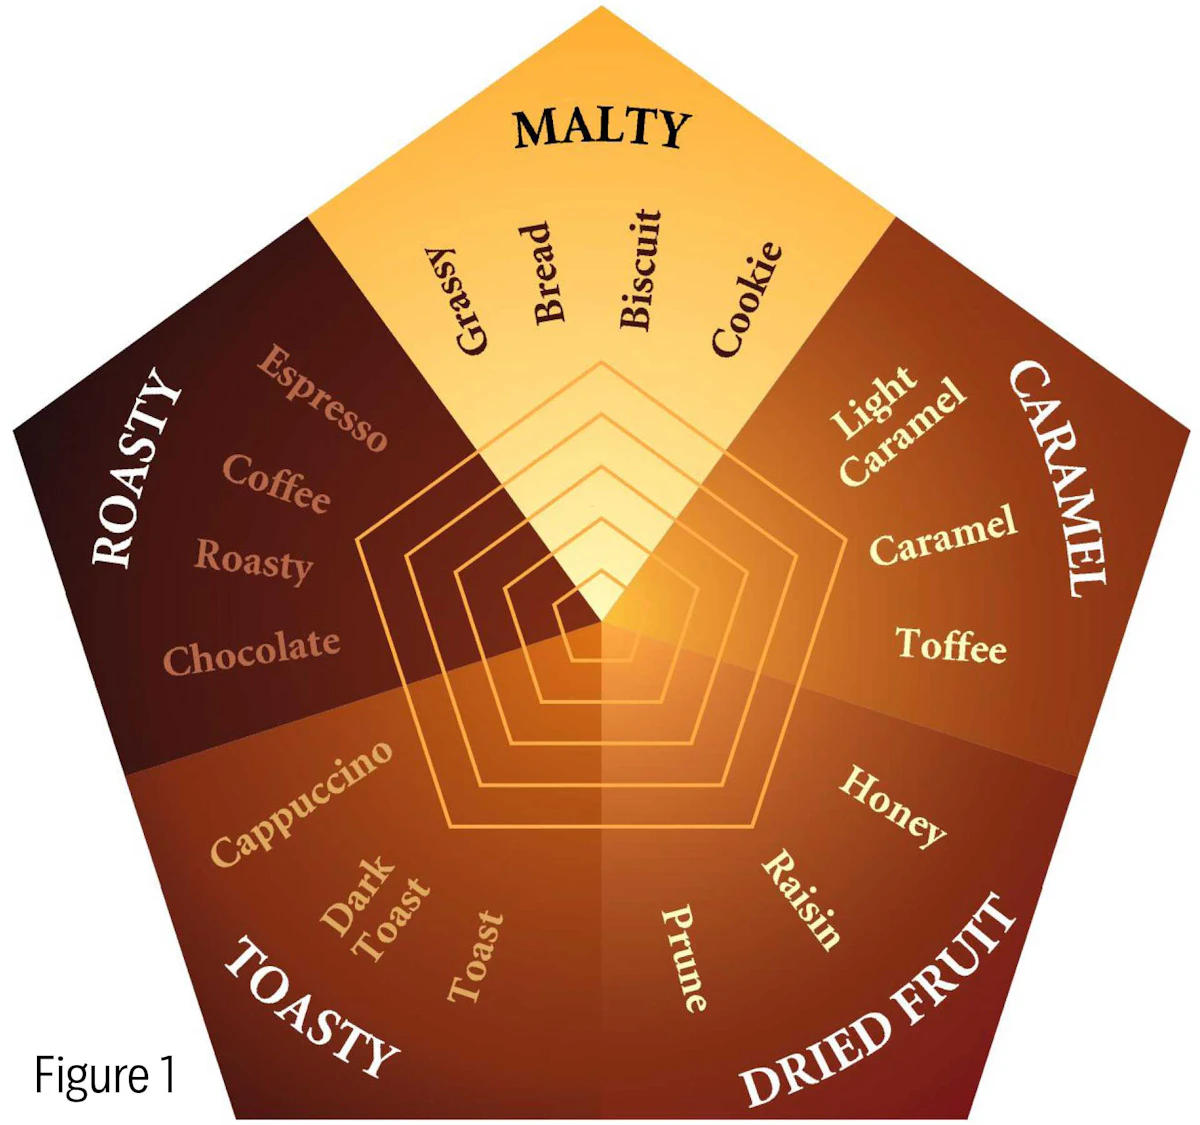
Chart: Randy Mosher
Even with this simple method, you can learn a lot. The differences between caramel (or crystal) malts can be especially vivid, even for similarly colored ones from different maltsters. Whatever method you use, be sure to record your impressions. You can use a full tasting sheet or just a blank sheet of paper and focus only on the malt aromatics. A vocabulary prompt such as a flavor wheel is helpful; you can also use the ones formatted like radar or spider charts (see Figure 1) to record intensities of attributes by putting a dot on one of the inner polygons, then connecting the dots when you’re done.
Depending on the proficiency of your panelists, a tool like the wheel in Figure 2 from Weyermann Malting offers more detail.

Chart: Courtesy Weyermann
Making and Tasting Malt Teas
While you can learn a lot by simply chewing on malt, trying this with the darkest varieties is pretty unpleasant. It’s much better to taste them in a liquid form—and if you can get test extracts from malts into an actual beer, so much the better.
Cassie Poirier at Briess Malt first developed the procedure known as the hot-steep method in 2015, and the American Society of Brewing Chemists later codified it. In essence, you crush the malt, mix it with mash-hot water, rest it 15 minutes, filter it out, and cool it. Then you taste the resulting liquid, without adding it to a beer.
- The official procedure for base malt calls for 50 grams (1.8 ounces) ground into a coarse flour in a coffee mill.
- For specialty (nonroasted) malts, the recommendation is to mix 25 grams (0.9 ounces) each of pale/lager malt and the specialty malt.
- For dark-roasted malts, the suggestion is to mix 7.5 grams (0.25 ounces) of dark malt with 42.5 grams (1.5 ounces) of base malt—a ratio of about 1:6.
Burr grinders are the most consistent, but blade grinders work fine—just be sure to count out the same number of seconds for each batch. Also be careful to avoid cross-contamination from one malt to the next. Go from light to dark, and if you really need to clean out the mill, grind up some white rice.
Mix the ground malt with 450 milliliters (15 fluid ounces) of distilled water at 149°F (65°C), or a little higher. This results in a ratio of 1:5 by weight, so scale that up and down as you please. After a 15-minute rest, filter the liquid through a paper lab filter or coffee filter. After cooling, evaluate the liquid by smelling and sipping it.
I’ve found it easier to make sense of these extracts in their normal context: beer. I use a modified procedure with a 1:2 ratio of malt to water, which results in a much more concentrated wort. You can then add this as a spike to a neutral beer, such as a pale lager. This method isn’t all that revealing for very pale malts, but for darker ones—especially crystal/caramel and roasted types—it delivers a realistic sense of how each malt would work in a beer. I generally used around 1 milliliter of this concentrated wort per 100 milliliters (3.4 fluid ounces) of beer, approximating a bit more than a typical usage rate for dark malts in a beer. Experiment with the spike quantity to suit your taste and what you’re trying to achieve.
It is possible to do any of these micro-mashes with a sous vide circulator, which works especially well when doing a bunch of samples at the same time. I’ve found that with more than a handful, it’s hard to time things so that each little mash gets exactly the same soaking time, introducing some variability. By loading up all your malts and room-temperature water in little pouches, sealing them—not under a vacuum, obviously—then putting them in a preheated bath, they all get the same treatment. Fifteen minutes after the bath comes back up to temperature, dump the water, and add cold water and ice. These chilled micro-mashes are stable and can sit until you filter them.
I like to cut down pre-made sous vide bags, so they hold just the right amount of grain and water. I find that making them tallish and keeping them standing up when chilling allows them to settle a little before filtering. It’s always easiest if you run the clearest portion through the filter first, then dump in the slurry when it’s still fluid enough to do so.
Coffee filters work fine, but lab filter paper may catch more solids. With a V-type filter, a pour-over coffee filter holder works great. Whatever funnel you use, make sure it has little ribs that allow the draining liquid to flow downward. If you have access to some fine stainless-steel or nylon mesh (a paint filter should work), make a pre-filter cone and set it right on top of the paper one. That will hold back some of the solids and make for faster draining. With larger batches, I’d recommend laboratory vacuum filtration, as it’s a lot faster.
For all extraction methods, after extracting and filtering, let the liquid stand for half an hour or more, then decant and leave the remaining sludge behind.
More Malt Hacks
What I’ve described above are simply tiny, short mashes. Even at just 15 minutes, they still convert a fair amount of starch, which works with paler malts. Because not all malts really need mashing to release color, flavor, and aromatics, quicker methods can be useful, especially with crystal/caramel and roasted malts.
While it might seem like an odd idea, an espresso machine does with coffee pretty much what we’re looking for with malt: It extracts flavor and color while leaving the solids behind. A single-shot espresso starts with seven to nine grams of coffee, so the samples are small. But, like my 1:2 ratio above, an espresso machine creates a strong malt extract that can easily flavor a pint or two of beer. Drip filtering can test your patience; this method bypasses it with brute force.
While these techniques are mainly meant for sensory evaluation, they can also be used in recipe development and tabletop prototyping. It’s even possible to prototype grain bills, to some extent, either by blending different amounts of these micro-mashes or by test-mashing a proposed grain bill. If you want to scale it up to a full recipe, it’s important to be accurate in your measurements and notes. With a particular ratio of malt to water, and an amount of the resulting test extract added to a beer, it should be possible to simply do the math to figure out the equivalent amount of malt(s) in the full-scale recipe.
It’s also easy to experiment with techniques such as cold-soaking, which can produce—as with cold-brew coffee—smoother and less pungent results. Scaling up to a brew, these cold infusions can be filtered and added at flame-out.
Because brewing can be cumbersome and slow, it’s great to taste quickly through a lot of options, making better beer, and—as a bonus—building a more capable model in your head.