“How do we know what we think we know?” This line from the opening sequence of the movie Run Lola Run might sound like little more than philosophical brooding, but for brewers large and small, it’s a question with legitimate and practical implications. Accurate measurement lies at the heart of brewing: Without it, repeatability is nearly impossible.
Temperature measurement, or thermometry, is one of the most critical process steps of any brew day. From heating strike water and mashing in to cooling wort and maintaining fermentation, good beer requires good temperature measurement.
Today we’re lucky enough to have access to reliable, accurate thermometers, but this wasn’t always the case. In fact, decoction mashing partly developed as a way to predictably raise the temperature of a mash when thermometers left much to be desired. Because water boils at a fixed temperature at a given elevation, adding boiling water (or boiling mash) to the main mash could achieve a desired temperature change even in the absence of good temperature data.
The thermometer you use as a homebrewer—whether it’s a simple meat thermometer or a sophisticated digital model—is considerably more advanced than what was available to early brewers, but it’s still not a perfect instrument. Like any measuring device, a thermometer needs to be periodically calibrated. This means measuring a known quantity and adjusting the instrument as needed to match.
In the case of a thermometer, we can take advantage of two situations that involve precisely known temperatures.
- Ice melts at 32°F (0°C).
- Water boils at 212°F (100°C) at sea level.
To calibrate your thermometer for the freezing point, just prepare an ice bath. The proportion of ice-to-water doesn’t much matter, as long as there’s a large enough mass of ice to keep it all from melting at once. Once the ice and water mix is stable, take its temperature. Your thermometer should read 32°F (0°C).
Calibration for the boiling point is almost as straightforward: Just measure the temperature of boiling water, and it should read 212°F (100°C). If you’re at sea level, that is.
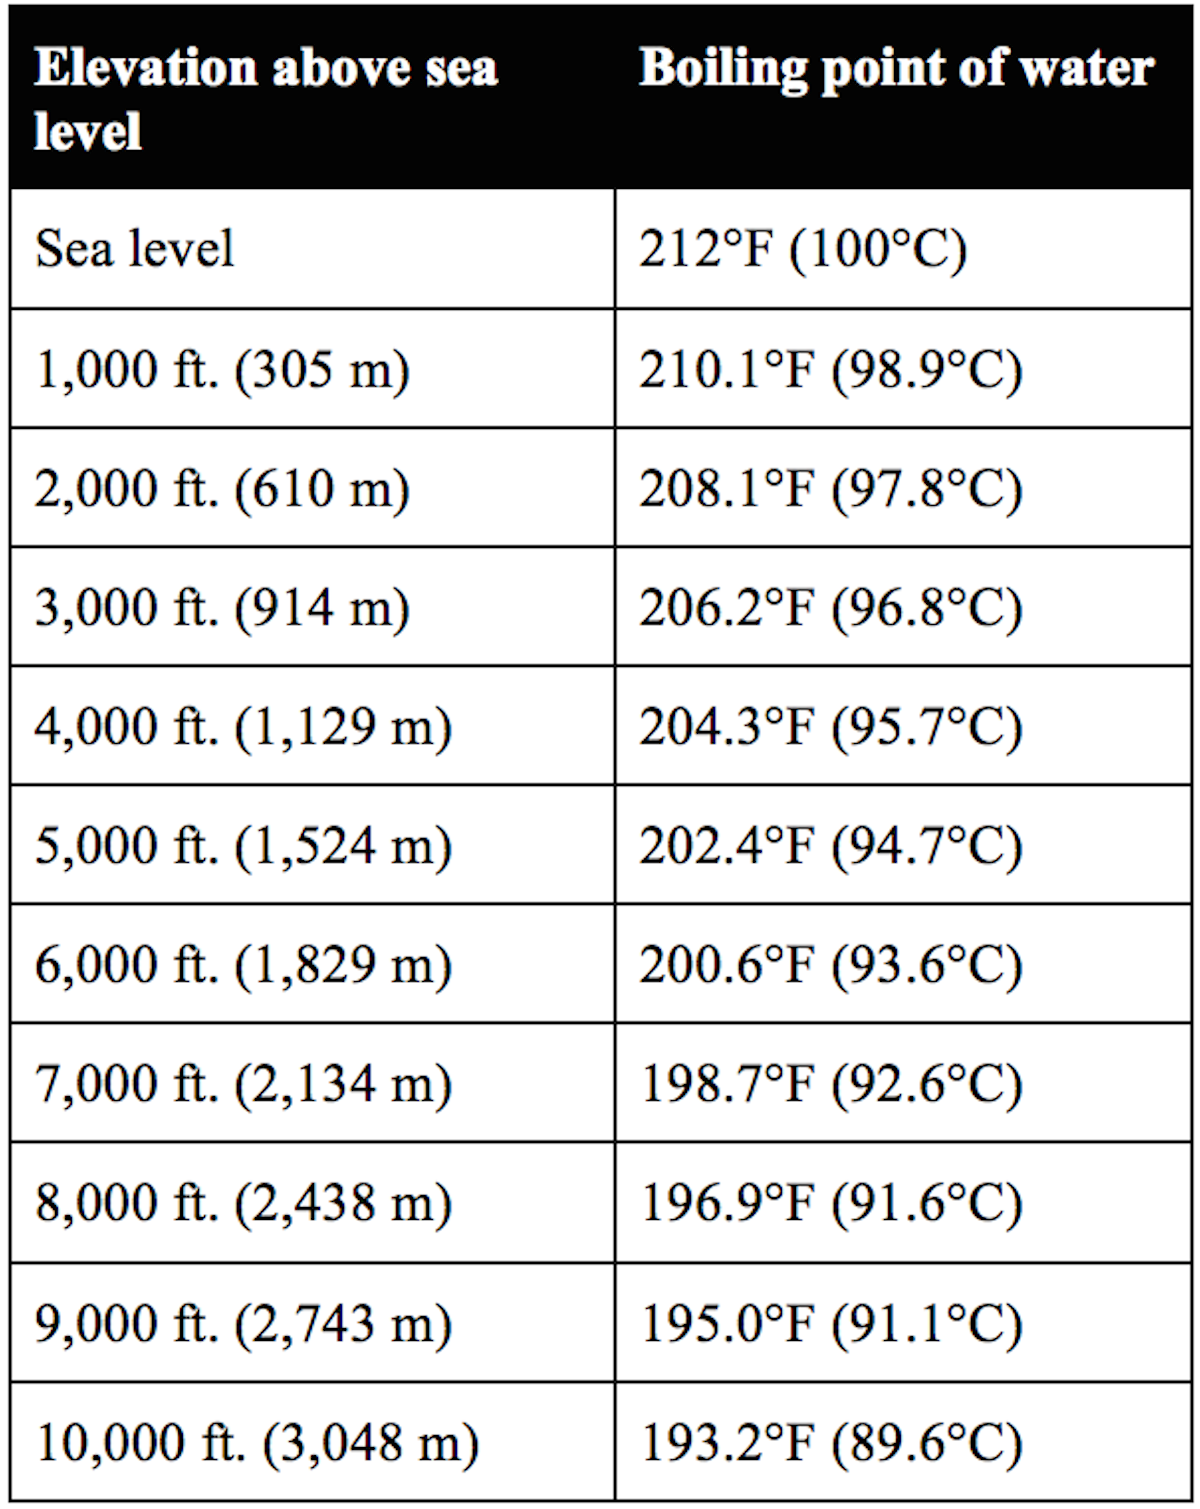
Those at higher elevations need to adjust for the change in the boiling point as altitude increases (and atmospheric pressure decreases). For every 1,000 feet (305 m) of elevation above sea level, subtract about 2°F (1.1°C) from the boiling point for an approximate value, or use the following table to be totally precise.

Remember, too, that dissolved ions can change the freezing and boiling properties of water (it’s why we put rock salt in old-fashioned ice-cream makers), so if your water supply is particularly hard, consider using distilled water for your calibration efforts.
Some digital thermometers feature built-in calibration capabilities. Just input the known temperature as you measure it, and the internal circuitry will automatically adjust future measurements to compensate. More basic models may require that you keep track of any known differences and adjust for them on the fly. If your bare bones thermometer measures the boiling point at 215°F (101.7°C), then you know that you need to reduce your measured temperatures by a couple of degrees.
Not all thermometers are equally sensitive at the lower and upper ends of their measurement ranges, so yours may only require calibration at one end of the spectrum, depending upon how it’s put together. See the specific details of your model to determine what works best for you.

