
A wort chiller is one of the most important pieces of homebrew equipment you’ll use. Without a chiller of some kind, your batch is vulnerable to infection, whether you let it cool down naturally or do a partial boil and add ice or cold water at the end. Immersion chillers are cheap and easy to sanitize, which is why they’re so popular. However, in this post we’re going to talk about counterflow chillers and how to make one.
A counterflow chiller is a device that has an inner copper tube that allows hot wort to flow in one direction, and a surrounding outer hose that allows cold water to flow in the opposite direction. This heat exchange arrangement is so effective because temperatures change most efficiently when the temperature differential is high. This method also protects against infection because each bit of wort remains hot right up until it enters the chiller. By the time the wort is released, it’s cooled to pitching temperature. This quick drop also gives a nice cold break to clarify your beer, and it uses less water than a simple immersion chiller.
Parts List
A. 25 ft (7.6 m) 5/8” (16 mm) garden hose
B. 28 ft (8.5 m) 3/8” (10 mm) copper tubing
C. Two tee fittings, 1/2” (13 mm) NPT female ends
D. Two adapters, 1/2” (13 mm) NPT male to 3/8” (10 mm) compression male
E. Two 3/8” (10 mm) compression nuts
F. Two adapters, 1/2” (13 mm) NPT male to 5/8” (16 mm) hose male
G. Two adapters, 1/2” (13 mm) NPT male to 5/8” (16 mm) hose female
H. Plumber’s tape
I. Several zip ties
Tools
• Pliers
• Crescent wrench
• Drill with a 13/32” (10.319 mm) bit
Steps
1. Expand the two part D adapters by drilling out the 3/8” (10 mm) side, using the 13/32” (10.319 mm) bit. This will make room for the 3/8” (10 mm) tubing to pass through.
2. Straighten out the copper tubing and the garden hose. Be careful not to kink the copper tubing during this step; copper is quite soft.
3. Slide the copper tubing through the garden hose. If necessary, use dish soap to lubricate the inside of the hose. Two feet (0.6 m) of tubing should extend past the hose on one side; this will be the wort outlet side. One foot (30 cm) of tubing should extend past the hose on the other side; this will be the wort inlet side.
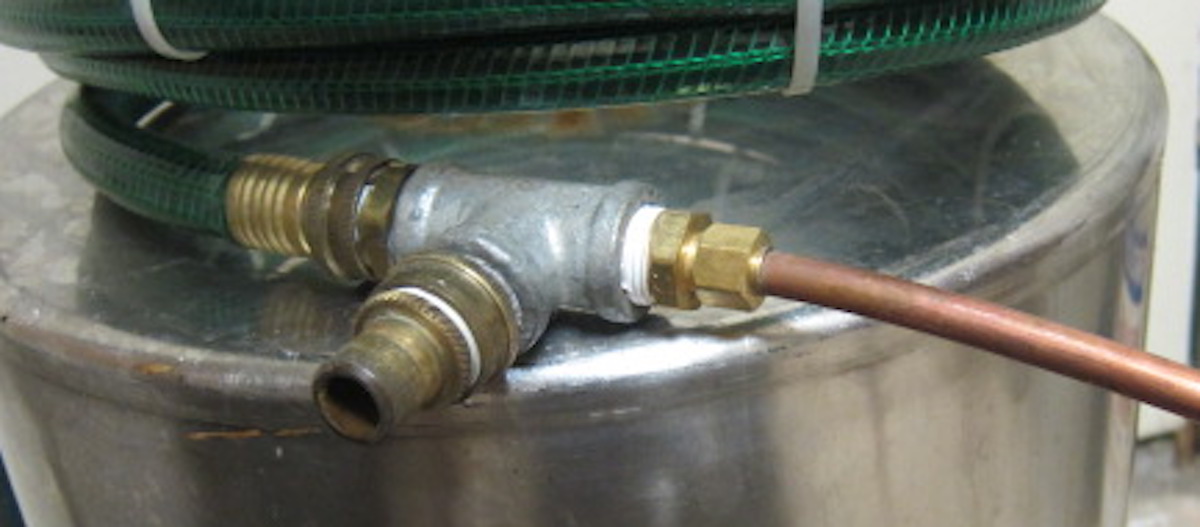
4. First, we’ll build the wort outlet fittings. Orient the jacketed copper tube to your left (with the 2-foot/0.6 m exposed copper tube in front of you) and one tee fitting (part C) with the tee facing down.
5. Choose the appropriate adapter (part F or G) to match the garden hose end of the chiller jacket. Attach the adapter to the left arm of the tee, using plumber’s tape to seal the join.
6. Slide the tee onto the copper tubing until you can attach the hose to the adapter, leaving the two feet (0.6 m) of copper tubing sticking out of the right arm of the tee for the wort outlet.
7. Attach adapter G to the bottom arm of the tee using plumber’s tape. This will be the water inlet.
8. Slide one of the adapter D fittings onto the copper tubing until it meets the tee.
9. Attach adapter D to the right arm of the tee using plumber’s tape.
10. Slide a compression nut (part E) onto the wort outlet tube and attach it to adapter D to form a seal between the fitting and the tubing. Leave this finger tight for the time being.
11. Next, we’ll build the wort inlet side in a similar manner. Orient the jacketed hose to your right and the other tee fitting (part C) facing down.
12. Choose the appropriate adapter (part F or G) to match the hose end of the chiller jacket. Attach it to the right arm of the tee, using plumber’s tape to seal the join.
13. Slide the tee onto the copper tubing until you can attach the hose to the adapter. This should leave about one foot (30 cm) of copper tubing sticking out of the left arm of the tee for the wort inlet.
14. Attach adapter F to the bottom arm of the tee using plumber’s tape. This will be the water outlet.
15. Slide the remaining adapter D fitting onto the copper tubing until it meets the tee.
16. Attach adapter D to the left arm of the tee using plumber’s tape.
17. Slide a compression nut (part E) onto the wort inlet tube and attach it to adapter D to form a seal between the fitting and the tubing. Leave this finger tight for the time being.
18. Next, carefully roll up the jacketed tubing into a coil, about 12–15” (30–38 cm) in diameter. This will make it more compact. Make sure that the water inlet and outlet tee arms end up facing outward from the center of the coil. Orient the coil so that the shorter wort inlet end is at the top.
19. Use zip ties to anchor the loops together at various points around the coil. This will help it hold shape.
20. Tighten the two compression nuts at the wort inlet and outlet.
21. The wort outlet can be curved downward to aim it into a fermentor.
You’ll need to tailor the wort inlet to your setup. If your kettle has a spigot or if you’ll use a pump, you can use the appropriate fittings to make the connection.
Use and Care
Using a counterflow wort chiller requires special attention for cleaning, but the chilling itself is quite simple. You’ll need to run sanitizer through the wort tubing before you use it. Next, you’ll need to set up the water flow and the wort flow:
1. Attach a cold water hose to the tee at the wort outlet side of the chiller.
2. Attach a drain hose to the tee at the other end.
3. Position the chiller to direct the wort outlet tube at your fermentor.
4. Attach the wort inlet to your kettle spigot, pump, or (temperature safe) racking tube.
Once the hoses are set up, you’re ready to go. Start the cold water flow first, then initiate the wort flow. The hot wort should be chilled enough to pitch by the time it gets to your carboy. If it seems too hot or cold, you can turn the water pressure up or down to adjust the temperature.
Some people have problems with hop solids clogging the chiller. Whirlpooling the wort at the end of the boil can help a lot, as will using hops bags for leaf hops. You can also attach a copper dish scrubber to the kettle spigot or uptake tube.
The bigger challenge is to make sure the chiller is thoroughly cleaned out after every use. I recommend circulating a hot PBW solution through the chiller for 5–10 minutes, then rinsing the chiller clean with water. Finally, sanitize the chiller with StarSan or Iodophor and drain it before putting it away.