
Grain to Glass: Eight Essential Steps to Making Great Beer
If all the ways I have been along were marked on a map and joined up with a line, it might represent a minotaur. — Pablo Picasso
This chapter will help you gain a solid understanding of how beer is made from start to finish. It’s a map of the territory ahead that, hopefully, resembles a straight line more than it does a mythological beast, compelling as Picasso’s minotaur may be.
I’m sure you are eager to make beer, but please take your time in this chapter. The fundamentals introduced here are universal and will serve you from the very first beer you brew as a nervous novice to the very last beer you brew as a satisfied centenarian (Homebrew makes you live longer: It’s a fact).
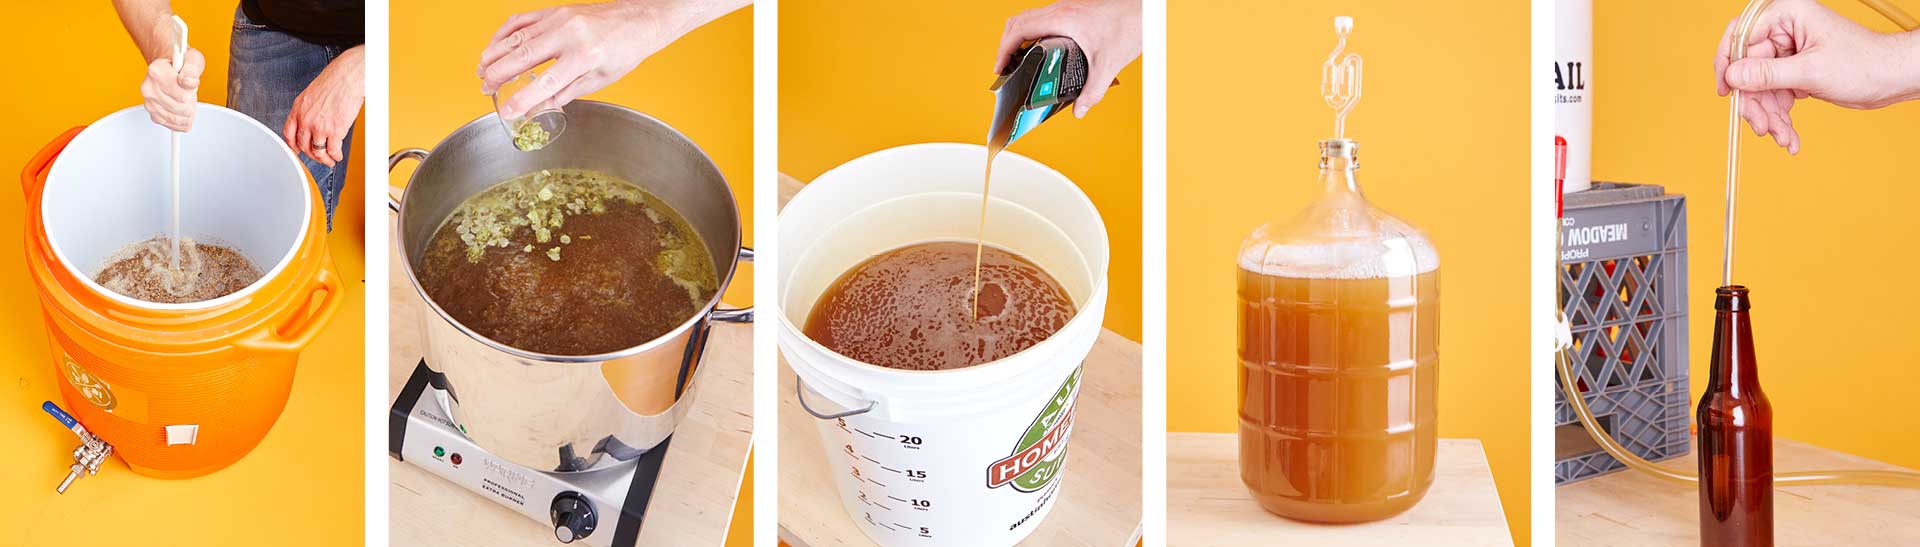
I like to break brewing down into eight essential steps. From Manhattan’s smallest kitchenettes to St. Louis’s largest production facilities, all brewers share a common link in these eight fundamental processes:
- Sanitizing equipment
- Preparing yeast
- Preparing wort
- Boiling wort with hops
- Fermenting wort into beer
- Maturing young beer
- Packaging properly aged beer
- Serving finished beer with care and dignity
The details of each step invariably differ from one brewer to the next, even among different employees of the same brewery. And each step, in turn, includes a number of important tasks. But the goal of every step remains the same whether you’re a brand-new brewer or an experienced brewmaster.
Let me, then, introduce the eight essential steps along with the goals we aim to accomplish at each stage. Remember, these will remain constant for virtually every beer you brew.
1. Sanitizing Equipment
Goal: Destroy unwanted microorganisms that could spoil your beer.
Good sanitation is a necessary requirement of making good beer; it is insurance against the possibility that some unseen microbe takes over your beer and ruins it. Our number one job as homebrewers is to give our chosen yeast the best possible chance of making good beer.
Imagine you are a kid and that you have to go to the pediatrician. You sit down in the waiting room with your mom or dad and immediately notice an Etch A Sketch® on the coffee table. In all likelihood, it displays the work of the patient who was there immediately before you. So what’s the first thing you do before you can offer up your own roughly hewn, monochromatic rendition of Starry Night? You shake the living hell out of it and erase all traces of what came before.
Sanitation is similar to shaking the Etch A Sketch. It creates a clean slate that’s ready to receive your masterpiece. In the case of brewing, the clean slate is an environment that’s mostly free of naturally occurring microorganisms. I say mostly because it’s neither necessary nor practical to create a completely sterile environment (more about that in Chapter 4). Instead, good sanitation gives your deliberately chosen microbes—yeast cells—the opportunity to establish themselves before anything else can. And that means reducing populations of ambient yeasts and bacteria to acceptable levels.
Seasoned homebrewers like to stress the importance of sanitation, and I encourage you to be diligent about sanitation from day one. But I don’t want you to panic about your inevitable small errors, so I’m going to tell you a secret:
When you first start out as a homebrewer, with brand-new equipment and a set of deliberate step-by-step instructions such as this book, the likelihood of contamination is rather low. It’s possible, but unlikely. Contamination becomes more of a problem once you’ve been brewing for a while. Perhaps your equipment gets scratched. Maybe you forget to sanitize it. Or your experiments with wild yeasts and souring bacteria contaminate a piece of tubing. But with your brand-new equipment and the deliberate sanitation methods described in Chapter 4, you’ll do just fine.
2. Preparing Yeast
Goal: Obtain a healthy culture of yeast cells that are up to the task of fermenting your beer.
It has been said so often that it sounds trite, but it bears repeating here because it’s absolutely true: Brewers don’t make beer. Brewers make wort, and yeast makes beer. If ever the yeasts rise up and learn to make wort, humans are doomed, and we’ll have to learn some new skills. Until then, our job is to make wort and then give our chosen yeast the best possible chance of turning it into good beer that we enjoy drinking.
Yeast preparation is one of the most important steps in any beer recipe, which is why I place it near the very beginning. When you first start brewing, preparing yeast is as simple as heading down to the homebrew store—or clicking a few buttons in a Web browser—and purchasing a ready-to-use package of healthy yeast cells. Many homebrewers purchase brand-new packets of yeast for each batch they brew because it’s convenient and top-notch yeast health is guaranteed.
If you’ve ever toured a mid-sized or large brewery, though, you’ve no doubt seen that such facilities often have entire labs dedicated to yeast management. That’s how important it is. Chapter 5 is devoted to discussing some techniques you can use at home to emulate what the big brewers do, such as reusing yeast from one batch to the next or building up a large colony from a smaller one. But know that such complications are totally voluntary: You always have the option of buying one or more packages of yeast and moving on with your life.
3. Preparing Wort
Goal: Extract fermentable sugars from grain.
Wort (rhymes with dirt) is the term for yet-to-be-fermented beer. If it were possible to squeeze sugar out of grain the way vintners press juice from wine grapes, then wort would be the resulting ambrosia that drips from the barley kernels. It takes a bit more to coax sugar from grain than it does to get juice out of grapes, but the effort is worth it.
That effort comes in the form of mashing, which, despite the name, involves little to no mechanical pressing whatsoever. Mashing is simply the process by which sugar is extracted from malted grain such as barley, wheat, or rye. I define malt a little more rigorously in Chapter 2, but for now, know that malt is raw grain that has been modified to make it more suitable for making beer (or whiskey). (Beer and whiskey both begin life by mashing malted grain. And both are destined for greatness.)
All mashing means (and seriously, this is all it means) is soaking some crushed malted grains in hot water at a specific temperature for a length of time. Sometimes you have to soak it at one temperature and then heat it to a higher temperature, but most of the time, it just means adding some hot water to crushed grain and leaving it there for an hour or so. That’s it. (No, seriously, that’s it. If you can make instant oatmeal, you can mash grain.)
After the mash is complete, then we can drain the sugar-rich barley juice into another vessel, where we boil it with hops before our yeast turns it into beer. But wait! There’s more.
Modern technology affords us the option of either mashing grain ourselves or taking a convenient shortcut by using malt extract, a sort of ready-made wort concentrate that you reconstitute with water. Either way, you end up with wort in the end. The only substantial difference is the path you use to get there. Most homebrewers start out using malt extract because it’s ridiculously simple, saves a lot of time, and avoids some potential pitfalls of mashing. (You might hear the occasional homebrewer poo-pooing extract, alleging that if you don’t mash your own grain then you’re not a real brewer. Ignore such negative voices, let them simmer in their curmudgeonly ways, and keep brewing!)
Some homebrewers move to all-grain methods after a while, and some don’t. Excellent beer can be made either way, and I cover both extract-based and all-grain wort preparation in Chapter 6 and Part III, respectively.
I brew mostly from grain these days, but about a quarter of my beer still begins life as extract, an even greater percentage when I get really busy. I recommend that all homebrewers at least start with extract-based wort preparation. This lets you focus on making good beer without having to bother with the details of mashing, kind of like learning to drive on an automatic transmission before deciding whether a stick shift is right for you.
Regardless of the method you use, what emerges from malted barley (or wheat, or rye…) is technically called sweet wort, which just means that it hasn’t yet been boiled with hops. I use the term wort generically to mean any proto-beer that our yeasty friends have not yet fermented. Whether that sugar-rich liquid happens to have been seasoned with hops yet should be clear from the context.
4. Boiling Wort with Hops
Goal: Sanitize wort and introduce bitterness, flavor, and aroma from hops.
Having collected wort from conducting a mash or from dissolving some malt extract in hot water, it’s time to boil the wort with hops. Boiling serves several purposes:
- It sanitizes wort.
- It extracts bitterness, flavor, aroma, and antiseptic compounds from hops.
- It concentrates wort down to the desired volume and strength.
- It slightly caramelizes and darkens wort.
- It promotes clear beer.
The boil usually lasts an hour, but it can take up to 90 minutes in some cases. Occasionally you’ll hear of a 2-hour or longer boil, but those are very, very rare, especially if you use extract-based wort. We cover all of the details of boiling in Chapter 7.
Boiling is an effective way to destroy microbes, which is one reason why travelers and outdoorsy types are advised to adequately treat or boil all water that might host nasties. In our case, boiling removes most of the naturally occurring bacteria and wild yeasts that live all around us, including on the grain itself. Boiling is therefore the final step in the sanitation process we started in Step 1, which means everything that touches wort after the boil needs to be properly sanitized to reduce the risk of contamination.
But it’s not just about being sanitary. Adding hops to boiling wort delivers the bitterness, flavor, and aroma that are so desirable in high-quality craft beer. The longer we boil hops, the more bitterness we get out of them, but at the expense of delicate flavor and aroma compounds. Shorter boil times preserve those desirable sensory qualities. Thus, adding the right amounts of the right kinds of hops at the right times during the boil is an important part of creating the beer we set out to make.
Fortuitously, the very hops upon which we rely for bitterness, flavor, and aroma also lend antibacterial compounds to the finished beer, helping stabilize it and improving its shelf life. In fact, the antiseptic nature of boiled hops is one reason that brewers embraced hops in the first place (more on that in the next chapter).
Boiling concentrates and darkens the wort, a phenomenon you might not notice in light styles such as Pilsner. But strong Scotch ales, for example, historically rely upon an extended boil to caramelize wort sugars and create flavors that would otherwise be difficult to achieve. The turbulent, violent nature of a good rolling boil also encourages proteins to precipitate out of solution, promoting clarity.
After we’ve boiled the wort for the appropriate amount of time, we rapidly cool it to the temperature at which it is to be fermented. There are several reasons for quickly cooling the wort:
- It reduces the likelihood of contamination.
- It improves flavor.
- It promotes clear beer.
You’ll sometimes hear brewers talk about a hot side and a cold side to brewing. The hot side consists of all processes up to and including the boil itself, while the cold side includes everything that happens after the boil, including cooling the wort to fermentation temperature. There’s no need to sanitize equipment on the hot side since boiling eliminates stray microbes, but once we enter the cold side, (I’ll say it again) everything that touches the wort needs to be sanitized.
5. Fermenting Wort into Beer
Goal: Convert wort sugars into carbon dioxide and alcohol.
After wort has been boiled with hops and then cooled to the proper fermentation temperature, it’s time for the main event: transforming that wort into beer! But this isn’t something we brewers can do. It takes yeast—and a lot of it—to perform this metabolic miracle.
When the wort is cool enough, we pitch the yeast, which is a fancy brewing term that means “adding yeast to wort.” There’s nothing ceremonious or regal about it. You literally dump a bunch of yeast into cool wort. Compared with all the cleaning and boiling and running around that happens in the run-up to pitching, the act itself is pretty anticlimactic. But pitching sounds more romantic and euphonious than dumping, so we stick with it.
Over a period of days, your army of yeast cells devours wort sugars, creating carbon dioxide and ethanol (alcohol) along the way. At the peak of fermentation, a brown foam called Kräusen (a German word pronounced “KROY-zen”) usually develops on top of the bubbling brew, a sure sign that miracles are happening within. The airlock attached to your fermentor may or may not bubble as carbon dioxide escapes from the lively beer.
Fermentation takes anywhere from 2 days to 2 weeks, but it’s up to the yeast, not us, to decide when the beer is ready. The only accurate way for us to know is by measuring the density of the in-process beer. When that density falls to the value we expect and remains stable over several consecutive measurements, then we know that fermentation is complete. We discuss fermentation in detail in Chapter 8.
6. Maturing Young Beer
Goal: Allow the young beer time to mature and stabilize.
Most brewing literature refers to the maturation, or conditioning, phase as “secondary fermentation.” I dislike this term because it’s misleading: Little to no fermentation actually takes place during the conditioning phase. Nonetheless, know that when you hear someone talk about secondary fermentation, or “racking to secondary,” it means that the beer is going to spend some time taking a little nap.
This period of time is when beer ages and matures, much as chili and stew improve in the fridge for a few days after you cook them. I supposed you could also call it ripening, but that suggests fruit or soft cheese, and it seems a bit out of place for our beer. The maturation period is mainly a period of rest in which the beer mellows out, but it’s also the time to add things such as dry hops, spices, oak, and other flavorings. We’ll get to those in due time—Chapter 9, specifically.
Many brewers will transfer, or rack, their beer to another vessel for conditioning to remove it from the large cake of yeast that will have accumulated on the bottom of the fermentation vessel. Others simply leave it alone. In either case, this period is when green beer stabilizes and yeast cells clean up after themselves. A simple pale ale may need only a few days of conditioning, while big heavy barleywines may need several months, or even a year, to fully mature.
This aging period is especially important for lager beers, which derive much of their smooth crisp character from aging for weeks or months at near-freezing temperatures. Ales don’t necessarily need to be aged cold, but certain German ales such as Altbier and Kölsch do traditionally benefit from a cold maturation phase.
7. Packaging and Carbonating Properly Aged Beer
Goal: Move beer into convenient serving containers and give the beer time to develop carbonation.
Packaging is the generic term for putting your beer into something from which you’ll serve it. Usually, this means bottles or kegs. The vast majority of beginning homebrewers bottle their beer, and even those of us who serve beer from kegs still bottle some of our creations to continue enjoying them for months or years to come.
Packaging is also when carbonation is introduced into the beer. In commercial settings, this often involves forced carbonation, in which carbon dioxide is injected at high pressure directly into the beer, not unlike home soda systems such as SodaStream®. Homebrewers who keg their beer can choose to force carbonate, but there’s another time-honored method that works just as well.
Natural carbonation is the most widely used method among homebrewers, especially those who bottle. Because homebrew is unfiltered, millions of live yeast cells remain in suspension even in beer that appears crystal clear to the naked eye. When we bottle our beer, we add a small dose of sugar before securing the bottle caps. Over the span of a week or two, the live yeast cells consume that sugar and create alcohol and carbon dioxide. The actual amount of alcohol produced is small and raises the overall concentration only negligibly. But the amount of carbon dioxide is sufficient to pressurize the bottle and dissolve CO2 throughout the beer.
More than a few breweries bottle-condition all or most of their beers, and the practice is de rigueur in Belgium. Some brewers claim that bottle-conditioned beer stays fresher longer and that the carbonation is smoother and more pleasant than force-carbonated beer. Others maintain that CO2 is CO2, regardless of how it is introduced. The only thing that ultimately matters is what you like, but as a beginning homebrewer, you’ll most likely bottle-condition your beer. Chapter 10 is all about packaging your homebrew.
8. Serving Finished Beer with Care and Dignity
Goal: Delight all five senses with a thoughtfully presented glass of beer.
The way you choose to serve your beer is every bit as important as the way you choose to brew it. Would you serve a barrel-aged barleywine in a red plastic cup for your anniversary? Would you pour a light American lager into a 6-ounce crystal snifter at the ballpark? Perhaps the answer is yes to both, and if so, great (I’ve enjoyed barleywine in red plastic cups around a campfire)! But do take the time to consider how you’d like your beer to be presented and make it a conscious choice, not an afterthought.
Glassware comes in all shapes and sizes, and choosing the right glass for the right beer is an art unto itself. The most important thing is to make sure that the glass is clean—I mean really clean—and the right temperature. This isn’t a book about glassware, but we discuss some of the most important considerations for serving your beer in Chapter 11.
One thing to know about serving bottle-conditioned beer is that there is always a small amount of sediment in the bottom of the bottle. It can’t hurt you, but it can affect the flavor and clarity of your beer. In most cases, you’ll probably want to avoid it, but there are also times when you may want to swirl the bottle and let ’er rip. We touch on both.
Let’s Brew Some Beer!
That’s it! You should now have a good overview of what it takes to make beer from grain to glass. If it’s your first time reading through this chapter, don’t worry if some of it still seems fuzzy. It will become clearer as we work our way through the individual steps in Part II.
This is an excerpt from our Illustrated Guide to Homebrewing by Dave Carpenter. Want to read the whole thing? Download it [here](https://shop.beerandbrewing.com/products/the-illustrated-guide-to-homebrewing-pdf-download).