A tavern is a place where madness is sold by the bottle.
— Jonathan Swift
———
Packaging, the seventh essential step in brewing beer, is the key step that transports beer from your fermentor to your face. Without it, we’d all have to grab long straws, gather ’round the beer, and dig in. But thanks to bottles and kegs, you can serve your homebrew just like the pros.
Bottling and kegging are sometimes left as an afterthought. You’ll run across innumerable recipes that go through meticulous detail on how to mash grain, add hops, and select just the right yeast strain. And almost all of them end with “then bottle or keg.” Don’t worry, we get into more details here.
Bottling
As a beginner, you’ll probably bottle your homebrew, so that’s what I focus on in this book. However, I provide some aspects of kegging in this chapter as an introduction to serving draft beer at home.
Types of Bottles
It is entirely possible to purchase brand-new, never-used beer bottles from a store, and there’s nothing wrong with doing so. However, if you don’t mind scraping a few labels, you can also get bottles from a liquor store that—this is key—come with beer in them. Drink the beer (ideally over a period of weeks—perhaps while your beer ferments and matures), clean the bottles, remove the labels, sanitize, and you’re ready to go.
If you choose to reuse bottles, be sure to source only models with pry-off caps—which is to say, bottles that require an opener. Bottles that accept screw caps, while convenient for the backyard barbecue, aren’t suitable for the kind of bottle capping we do at home.
The most common beer bottles you’re likely to encounter include the following:
- Longnecks: These are the most common and most familiar beer bottles you’ll run across. American longnecks hold an even 12 fluid ounces (355 ml), while those from Europe and other metric civilizations hold 330 ml (11.2 fl oz). These are the preferred type of bottle for most homebrewers. You’ll need about fifty of these to package 5 gallons (19 l) of homebrew.
- Bombers: Probably the second-most-common bottle among homebrewers, bombers hold 22 fluid ounces (651 ml), which means that for every eleven standard longnecks, you need only six bombers (i.e., about thirty to package 5 gallons (19 l) of homebrew). Fewer bottles to fill means less time bottling and more time brewing! Cap a bomber just as you would a standard longneck.
- Shortnecks and stubbies: A few commercial breweries package in squatty bottles. Sierra Nevada Brewing Company and Alaskan Brewing Company, for example, use bottles that are slightly wider than the standard-issue longneck and feature a somewhat shorter neck. Stubbies are those favored by Redhook, Red Stripe, and Full Sail’s Session series. Some brewers use these kinds of bottles, but for every success story, there seems to be another involving improper seals or broken glass. Use them if you can, but don’t feel bad if you can’t.
- European half liters: These bottles are great if you can find them. At 500 ml each (16.9 fl oz), their capacity is much closer to a true U.S. pint than the standard longneck. Furthermore, they tend to be made from thicker glass, which makes them sturdier and less likely to explode if you accidentally overcarbonate. I also happen to think they look nicer than most beer bottles. You’ll need about forty of these to package 5 gallons (19 l) of homebrew.
- Swing-top “Grolsch” style bottles: Swing-top bottles are a dream to use. No bottle capper is needed; just fill the bottle and clamp down the integrated stopper using the wire bale. The gaskets need to be changed from time to time, but that’s about the only disadvantage to these trusty beer holders. Like European half liters, these are usually sturdier and can handle somewhat greater pressure than standard-issue bottles.
- Champagne bottles: Champagne bottles offer perhaps the most elegant presentation for your homebrew, but they may or may not be the right solution for you. Corking these bottles requires a completely different set of equipment. Most champagne bottles accept crown caps, but you’ll need different-sized caps for European and North American bottles, as well as a bench capper, which is a sturdy device that can cap just about anything. I love using these kinds of bottles, but I recommend waiting until you’re well into homebrewing before trying them on for size. A major advantage of champagne bottles is that they are heavy and stand up to much higher pressures than single-use beer bottles.
- Belgian bottles: Belgian bottles are incredibly beautiful, but most of them need to be corked. A few will accept bottle caps, but again, a bench capper is the preferred device with which to seal them. Nonetheless, if you’ve been steadily building up a sizeable supply of beer bottles from the local order of Trappists, it might be worth looking into the equipment you need to seal these beauties.
Racking and Priming
Once you have your selected arsenal of bottles, you need to prepare your beer for the bottling process. Homebrewers use a method called bottle conditioning to create carbon dioxide within the bottle; this method involves adding a small amount of sugar to each bottle before filling it with beer and then sealing the cap.
Over a period of several days, residual yeast that remains in the unfiltered beer (there’s yeast in there even if you can’t see it) consumes that sugar, producing carbon dioxide and a small amount of alcohol in the process. This carbon dioxide, trapped within the bottle, is absorbed into the beer and creates natural effervescence.
It’s entirely possible to individually dose each bottle with sugar, but doing so is tedious, boring, and unnecessary. Instead, we do what is called bulk priming, in which we mix a liquid sugar solution right into the whole batch before we bottle it. This is most effectively executed using a bottling bucket.
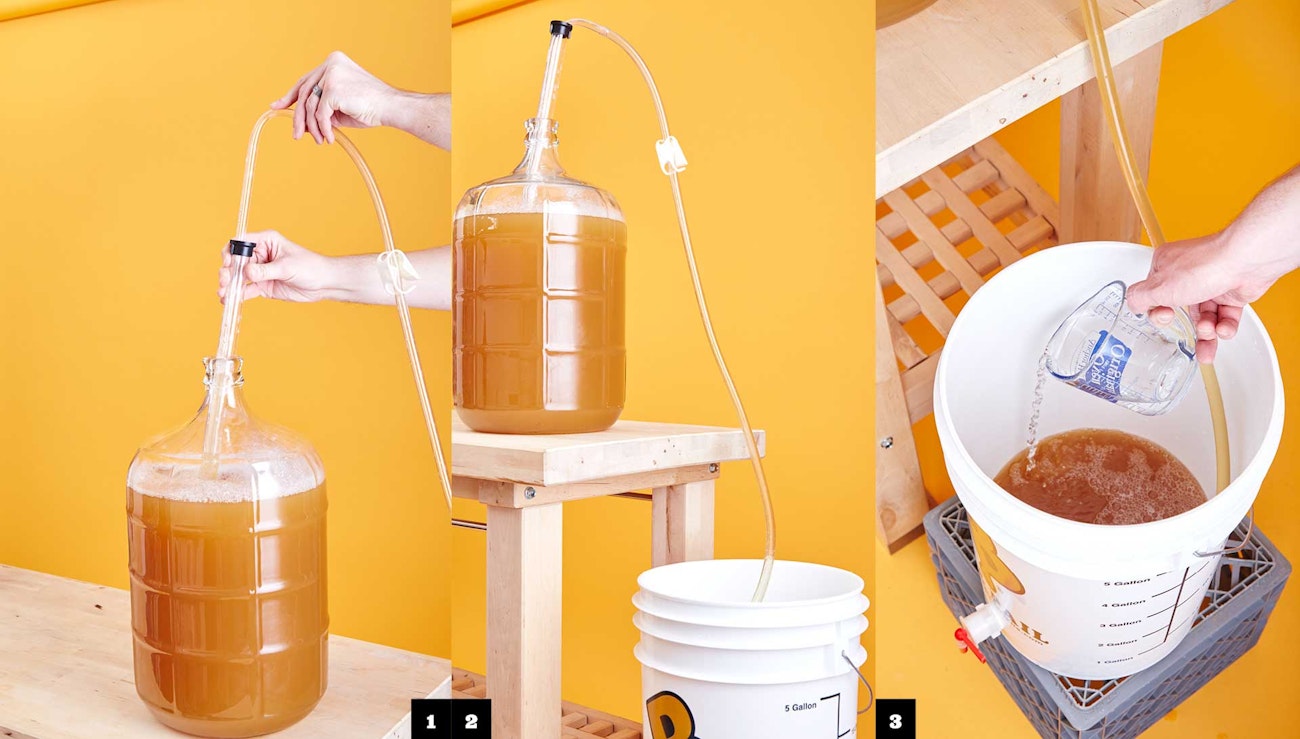
A bottling bucket is just a regular bucket that has a spigot in the bottom. Finished matured beer is racked into this bucket (1,2), and as the beer flows in, we pour in a carefully measured solution of sugar (3). The natural swirling that occurs during the transfer process is sufficient to thoroughly mix the sugar throughout the finished beer, and when racking is complete, we have a mixture of beer and sugar that’s ready for bottling and carbonation.
Filling and Capping
With our bucket full of primed beer (4), it’s time to fill each bottle and snap on a cap. Filling is done right from the bottling bucket by connecting a special bottling wand to the integrated spigot using a length of plastic tubing. The bottling wand (5) has a tip that permits beer to flow when pressed against the bottom of a bottle and halts said flow when withdrawn. Thus, we can fill each bottle individually with our mixture of beer and sugar.

You could cap each bottle immediately after filling it, but most of us find that an assembly line setup speeds things along considerably. I usually fill twelve bottles in a row and then cap those twelve and put them away before moving on to the next set in the series. Why twelve? Well they fit in a 12-pack holder. You might go with six or twenty-four or the whole batch. It’s your call.
Capping the bottles requires a bottle capper, which for most beginners will be a wing-style capper. Simply place a sanitized crown cap on top of a bottle and place the capper’s bell over the crown. Pushing down on the two wings engages a pair of metal plates that grasp the bottle’s neck on either side while simultaneously plunging the bell down and onto the cap. When the two wings snap down to become horizontal and parallel to the bottling surface, the cap seats firmly onto the bottle, and you’re done (6). Easy peasy.
Repeat for the duration of your batch and then clean up your mess. Once you get the hang of it, you can package fifty bottles or so in less than an hour. If you have a dishwasher, the bottom rack is a convenient place to hold bottles as you fill them. When your task is complete, just close the door to contain the inevitable spilled beer.
Bottle Conditioning
Because bottled homebrew relies on the natural activity of yeast to create carbonation, you need to give those yeast cells the best environment to do their thing. And that means a room-temperature—or slightly warmer—location, ideally one in the dark. Some Belgian brewers even maintain special “warm rooms” in which bottled beer can condition and carbonate. (Some beginning lager brewers wonder whether lagers need to be held at cold temperatures during this phase, and the answer is no. You can carbonate your bottles of lager at room temperature or higher without having any flavor impact on the final product.)
It will take at least 2 weeks for your beer to carbonate. I recommend waiting 3 weeks if you can, but I realize this is hard to do. Keep in mind, though, that the following characteristics serve to prolong the amount of time it takes for beer to carbonate and condition:
- Strength >> The stronger the beer, the more slowly it carbonates.
- Age >> A beer that has been aging for 6 months will take longer to carbonate than one that is only a week or two old. There’s simply less yeast to do the job.
- Temperature >> The colder the storage environment, the longer carbonation takes.
- Lager >> By virtue of the long cold lagering phase that characterizes these beer styles, many emerge from the lagering chamber with fewer yeast cells in suspension than an equivalent ale. There’s still yeast in there, but relying on it may mean that your bottles take several weeks to condition.
If you’re worried that your beer may experience difficulty with carbonation due to one of these factors, feel free to sprinkle a sachet of dry champagne yeast into the bottling bucket as you rack your beer. A little extra yeast may just be the boost your beer needs to condition more quickly. (Consider storing your bottled beer in sturdy boxes or plastic tubs.)
Remember: Two weeks at least!
Kegging
I think that every homebrewer dreams of serving beer on draft in the comfort of his or her own home, and an entire sector of homebrewing revolves around enabling you to do just that. This isn’t a book about kegging, but it is worth taking some time to introduce you to the practice so that you have basic familiarity with the idea. If you decide that kegging is right for you, check out Craft Beer & Brewing’s online courses (available at learn.beerandbrewing.com):
- Kegging Your Beer introduces you to the kegs themselves and shows you how to disassemble and put them back together for maintenance. You also learn how to sanitize and fill kegs, determine an appropriate serving pressure, and more.
- Draft Systems goes beyond basic kegging to teach you how to build and maintain a draft-beer serving system, commonly called a kegerator. In this course, you learn how to build an entire draft system from the ground up and even how to work with nitrogen for a creamy Guinness-style stout.
Types of Kegs
You may be familiar with commercial kegs, also known as Sankey kegs. These are the industry-standard stainless-steel vessels available in half-barrel (15.5 gallon), quarter-barrel (7.75 gallon), and sixth-barrel (5.16 gallon) sizes. The sizes are different, but all use the same single-piece coupler, which is commonly called a tap. The coupler admits pressurized carbon dioxide into the keg and allows beer to flow out of the keg, through a beverage line, out of a faucet, and into your glass.
If you’ve ever been at a party where kegs of beer are available in large buckets of ice, chances are the couplers didn’t connect to carbon dioxide tanks. More likely, there was a hand pump that you’d use to pressurize the keg and force beer out through the cobra-shaped picnic faucet. These are only to be used in situations where the keg will be emptied within a brief period of time. Air causes beer to go stale, so professional and home draft systems always rely upon carbon dioxide, not air, to dispense beer.
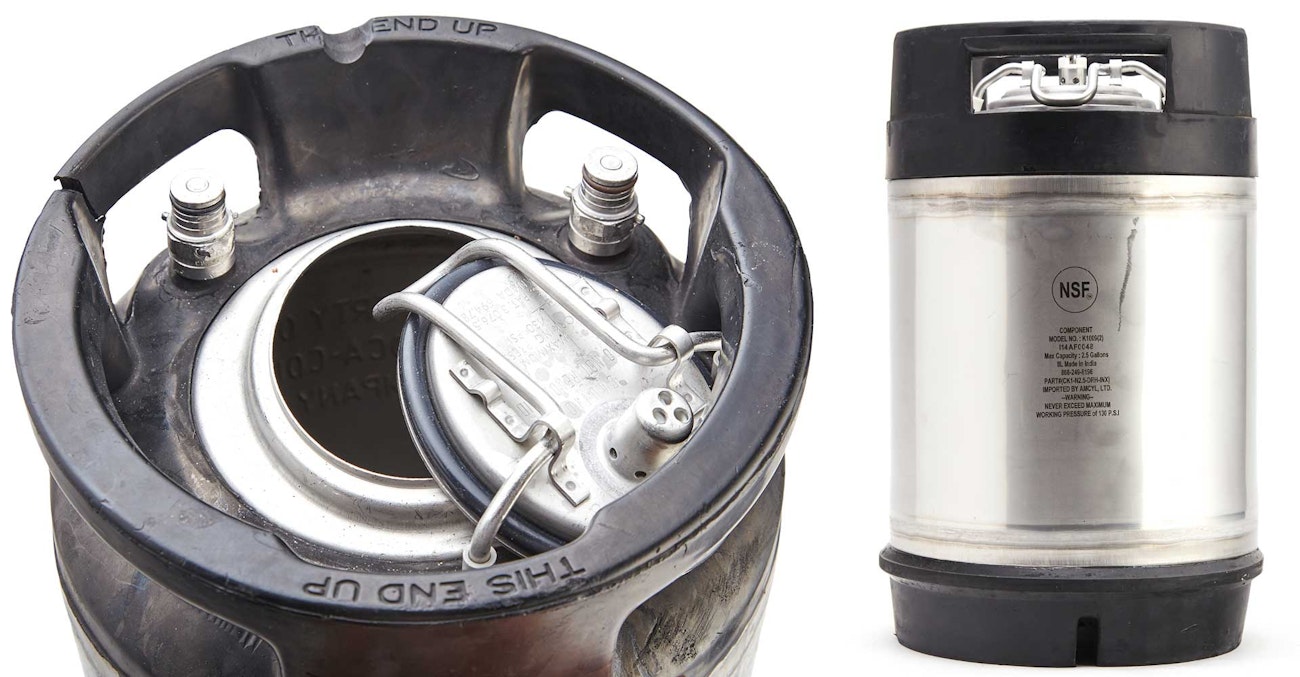
Homebrewers rarely use Sankey kegs. Most of us use old soda kegs, which conveniently hold exactly 5 gallons (19 l) and feature a large, oval-shaped lid that is easily removed for racking beer right into the keg. Two posts on top of the keg accept carbon dioxide (the gas post) and provide an escape route for beer (the liquid post). These kegs are often called “Corny” kegs, which is short for Cornelius, one of the manufacturers that originally supplied these types of kegs to the soda industry.
Most soda manufacturers have switched to syrup-in-a-bag dispensing systems, in which syrup concentrates are mixed with carbonated water at the point of sale. For some time, this meant that legions of old soda kegs were available at very attractive prices. Those days are drawing to a close as homebrewing grows in popularity and homebrewers like us snap up old soda kegs that may not look pretty but still hold pressure.
Fortunately, manufacturers have responded to the demand for quality kegs, and now purpose-built models are popping up everywhere. Some are merely replicas of what the soda companies once used, but modern interpretations may have such handy features as integrated pressure gauges and hooks for hanging bags of dry hops right in the keg. One retailer even sells a keg that can expand and collapse to accommodate different batch sizes, and another sells a 2.5-gallon (9.5 l) mini keg (left) that’s built to easily fit inside a refrigerator.
Filling and Carbonating
There is neither mystery nor magic when it comes to getting your beer into a keg. Just rack beer right into it just as you’d rack into a secondary vessel for conditioning or a bottling bucket for bottling. You can even include priming sugar so that the beer carbonates in the keg, as if it were a large bottle. Due to physical laws that are beyond the scope of this book, only about a third as much priming sugar is needed, however—about 1.5 ounces (43 g) for 5 gallons (19 l) of beer.
Most brewers who package in kegs don’t use priming sugar. Instead, we turn to the very same carbon dioxide that we later use to push beer out of the keg and into our glass. Carbon dioxide naturally dissolves into beer when applied at the right temperature and pressure. So, instead of priming the keg with sugar, many of us go ahead and place the keg in cold storage and hook up the gas, usually at around 12 to 15 pounds per square inch (83–103 kPa). Over the course of a week or so, that carbon dioxide dissolves into the beer and carbonates it right up. With a little shaking here and there, you can enjoy carbonated beer in as little as a day.
Ra
Getting beer into kegs is easy. Getting it out, however, requires a little extra effort.
Dispensing
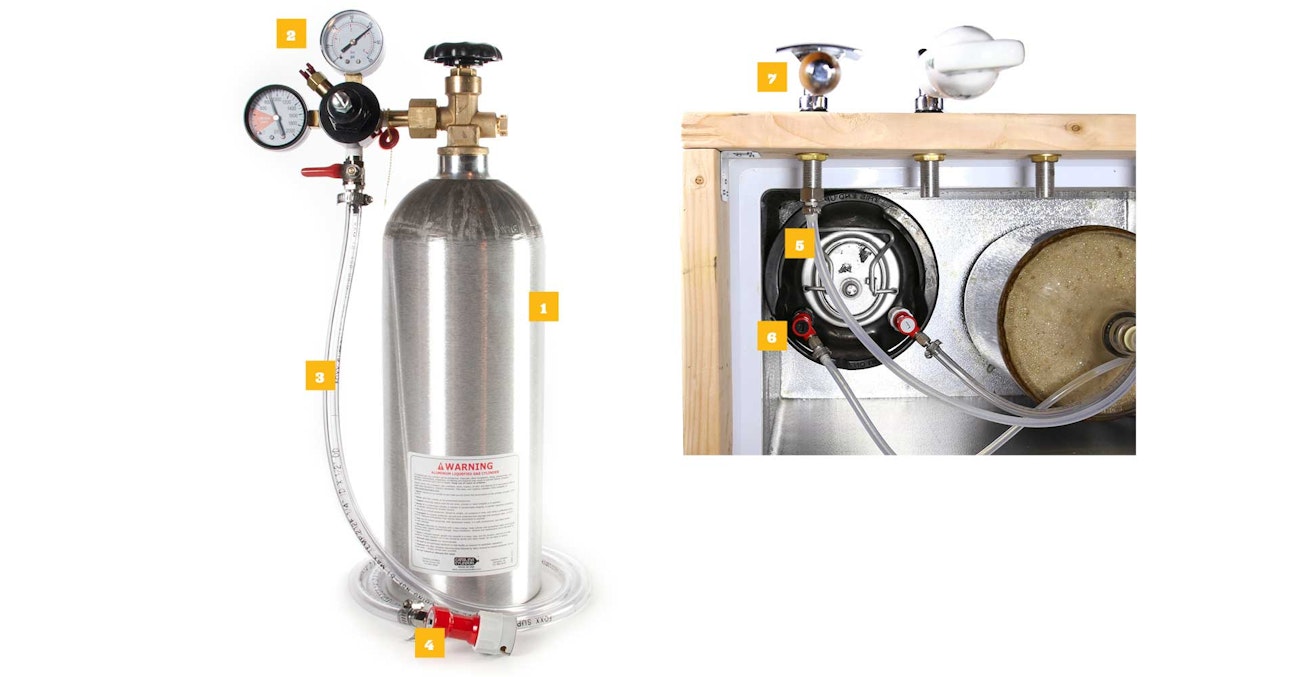
In addition to a keg, you need, at the very least the following items:
- A carbon dioxide cylinder (1) (tank) filled with CO2
- A carbon dioxide regulator (2) that attaches to the cylinder and safely drops the gas pressure to what is needed for dispensing beer
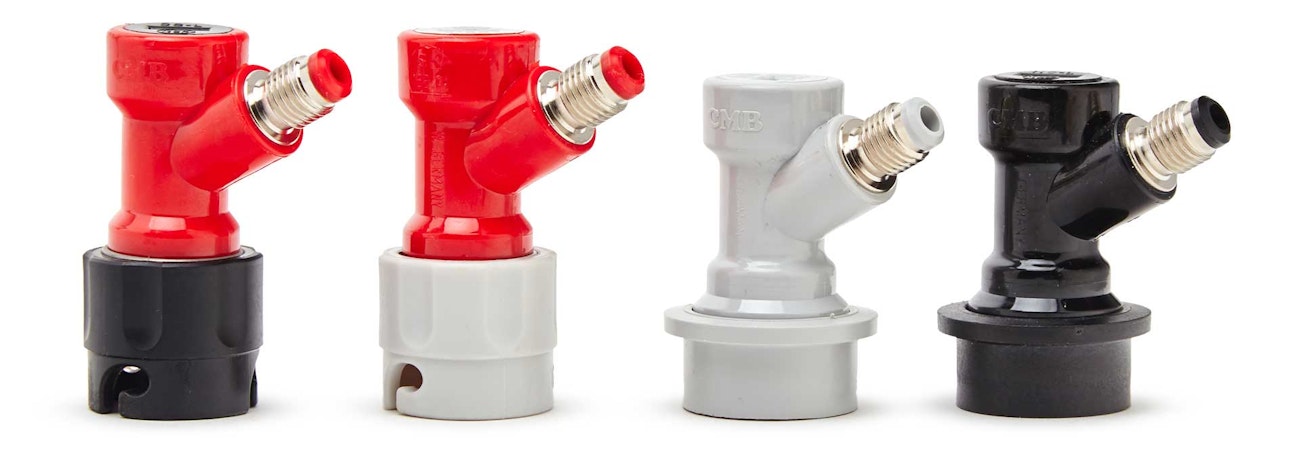
- A length of gas line (3) and a gas disconnect (4) to connect the regulator to the keg
- A length of beverage line (5) and a liquid disconnect (6) to get beer out of the keg
- A faucet (7) that connects to the free end of the beverage line and delivers beer to your glass
In the simplest setups, all of the above simply sit in a refrigerator. When you want a beer, you open the door and use the same kind of picnic faucet you remember from parties to dispense beer. However, for many brewers, the appeal and convenience of a full home draft system are too alluring to ignore. This means installing permanent, dedicated faucets just like those used to pour beer in your favorite craft-beer bar. Some of us use an old refrigerator and mount faucets right on the door. Others attach a shiny draft tower to the top of a small dorm-style refrigerator and mount faucets there. No matter how you do it, a home draft system is the ultimate way to serve and enjoy beer at home and a guaranteed way to reconnect with friends you never knew you had.
Homebrewing stores sell everything you could possibly need to keg your beer and maintain a clean, efficient draft system. We can’t cover all of the details of kegging and serving draft beer in this book, but our online classes will teach you everything you need to know should you decide that route is for you.
Moving On
With our homebrew safely bottled or kegged, we have almost reached the final step of our journey: Serving and enjoying. Whether you bottle or keg your beer, there will be some period of waiting before you can finally pour a glass and enjoy the fruits of your labor. So be patient. Your reward is just around the corner.
This is an excerpt from our Illustrated Guide to Homebrewing by Dave Carpenter. Want to read the whole thing? Download it here.