
O thou invisible spirit of wine, if thou hast no name to be known by, let us call thee devil!
— Cassio, William Shakespeare’s Othello
———
We humans have enjoyed alcoholic beverages for millennia, but our grasp of yeast’s role in fermentation goes back a mere 150 years. In that century and a half, though, scientists, brewers, and bakers have made enormous strides. While our understanding of fermentation remains incomplete, we know enough to reliably and repeatedly coax favorable results from yeast (Saccharomyces, at least).
Yeast preparation, which you’ll recall from Chapter 1 is the second essential step in making beer, is the generic term that encompasses whatever means you use to ensure that, come brew day, you have a healthy population of yeast cells that are ready to turn wort into beer. Several ways one can do this, roughly in order from easiest to hardest, include the following:
- Purchase one or more packages of liquid or dry yeast and add it to the wort.
- Purchase a package of liquid yeast, grow it into a larger culture, and add that to the wort.
- Take a portion of yeast left over from another batch of beer and add it to the wort.
- Take the dregs from the bottom of a can or bottle of unfiltered, unpasteurized beer (commercial or homebrew), grow it into a larger culture, and add that to the wort.
Yeast is the only beer ingredient that makes more of itself, and you can use this convenient fact to your advantage and reuse yeast time and time again if you want. However, until you have a few batches under your belt (and perhaps even well thereafter), I recommend taking the path of least resistance.
Purchasing fresh packets of liquid or dry yeast every time you brew guarantees that you have a healthy colony of yeast cells, which reduces the likelihood of infected beer or stalled fermentation. Most professional brewers reuse (or, in brew-speak, re-pitch) yeast from one batch to another, but I’ve spoken with many who procure fresh yeast each and every time they brew.
Liquid and Dry Yeasts
Homebrewers today have more yeast choices than ever before, and growth seems unlikely to slow down. As homebrewing’s popularity increases, new yeast manufacturers are popping up here and there, and established suppliers are upping their game, expanding their offerings, and delivering more strains than you’re likely to ever need.
As we discussed in Chapter 2, yeast is available to homebrewers in two forms: liquid and dry. Both are excellent, and both will make great beer if treated well and used properly. More strains are available in liquid form than in dry, but dry yeast has a longer shelf life and is easier to use for spur-of-the-moment brewing. Ultimately, the choice of one over the other depends upon your personal preferences.
Liquid Yeast
Liquid yeast products contain a liquid growth medium in which billions of yeast cells are suspended. These products are perishable and best used fresh, although making a starter (more on that soon) can boost the viability of old cultures. The two largest suppliers of liquid yeast products, White Labs and Wyeast Laboratories, collectively offer hundreds of strains of Saccharomyces (conventional brewer’s yeast), Brettanomyces (wild yeast), and bacterial cultures of Lactobacillus and Pediococcus bacteria for sour ales.
Smaller suppliers such as GigaYeast, East Coast Yeast, The Yeast Bay, and Imperial Organic Yeast sell some harder-to-find products, including The Alchemist’s so-called “Conan” strain and a strain said to originate from the old Ballantine brewery. You’ll also find esoteric blends of bacteria and wild yeasts should your homebrewing journey take you into sour territory.
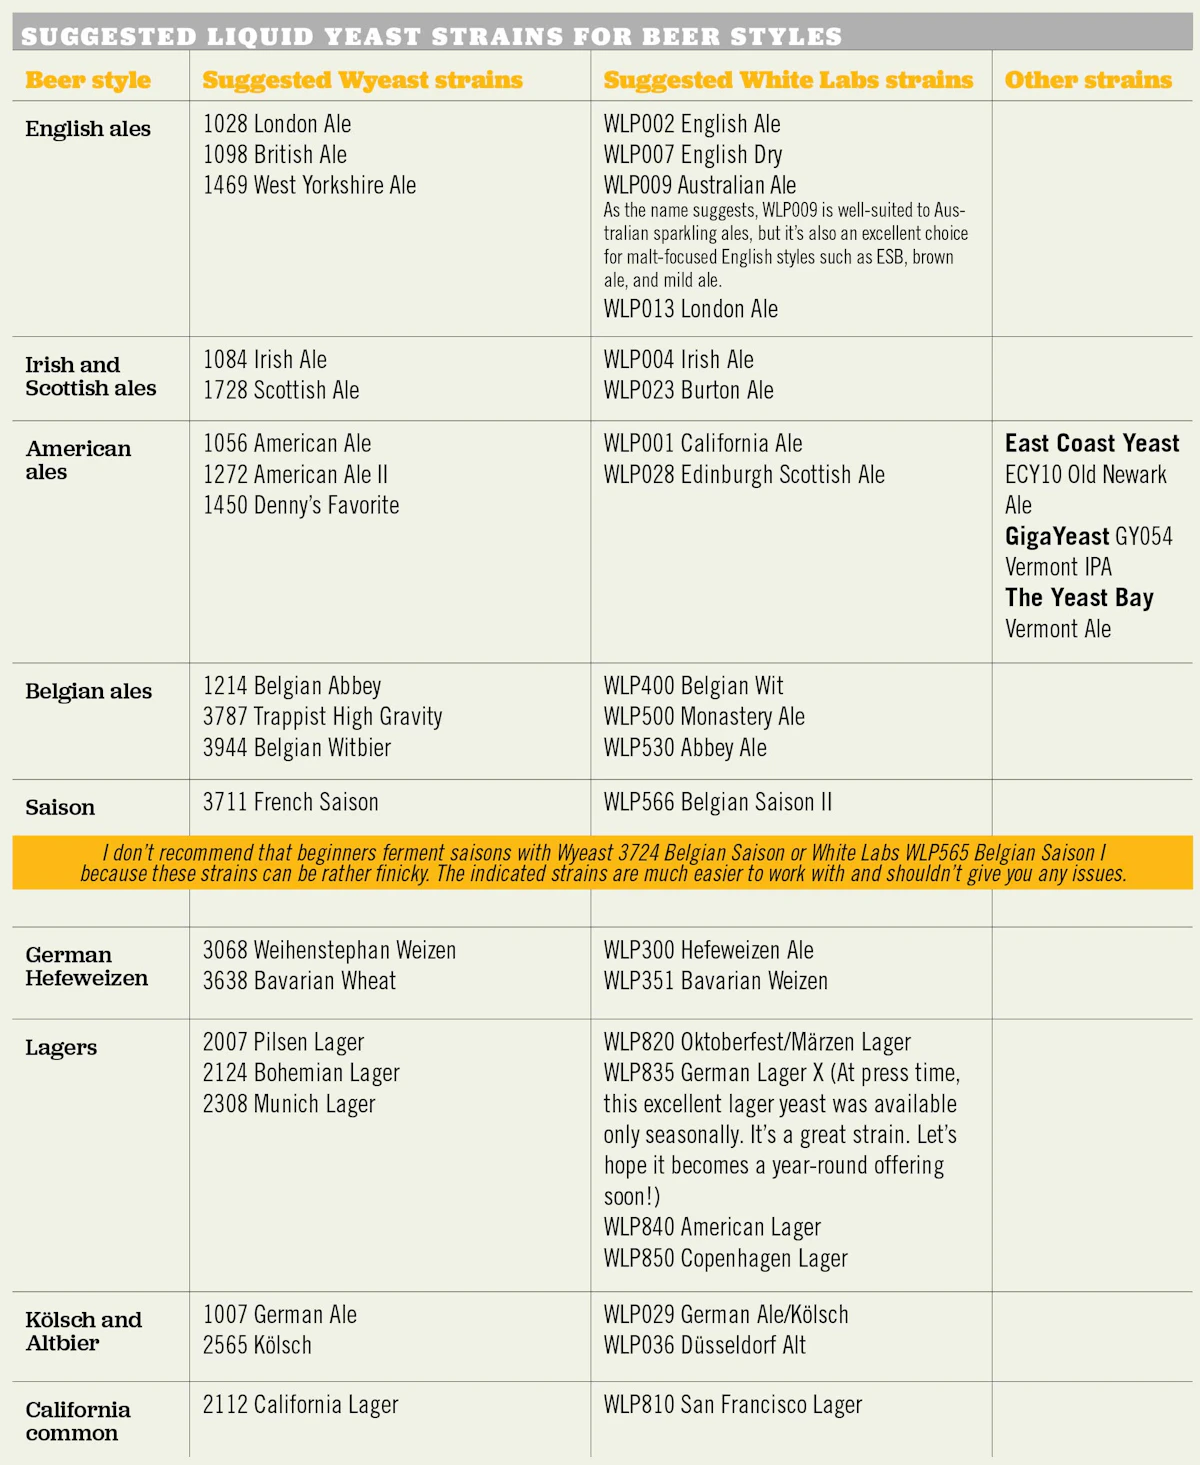
The vast array of liquid yeast strains is growing all the time, and attempting to classify them all here is pointless. However, the table on page 45 is a good starting place for brewing a variety of styles. The suggestions offered here are generally well-behaved yeasts that don’t require much special treatment.
Because liquid yeast products are perishable, they must be transported and stored under refrigeration and used as soon as possible. If you have fresh, well-treated liquid yeast, using it couldn’t be easier. You simply take it out of the refrigerator a few hours before you need it. When you’re ready to pitch the yeast, you open the yeast packet and pour the contents directly into fresh wort.
Dry Yeast
Despite all of the wonderful and diverse liquid strains available, more often than not, I use dry yeast. There are certainly beer styles for which I prefer the liquid options that are available, but for the vast majority of English- and American-inspired ales, and even Continental lagers, dry-yeast products exist that are just as good as their liquid counterparts. Dry yeast stays viable for long periods of time, takes up very little room in the refrigerator, and can be used at the last minute.
I enjoy brewing lagers, and making a great lager means using several packets of liquid yeast or growing a large yeast population using a starter. And I do this several times a year, but it requires some planning to either buy fresh yeast or prepare a starter. However, one of the most widely used lager yeasts in the world, Weihenstephan W 34 / 70, is available as a dry product, which means I can keep a few packets in the fridge and choose to brew on a random Sunday afternoon with little to no planning. Two packets of W 34 / 70 added to 5 gallons (19 liters) of Pilsner wort are enough to get it up and running quickly and conveniently.
The quality and selection of dry yeast have dramatically improved in just the past five years, and there’s every reason to believe that they will continue to do so. Some of today’s most popular dry yeast products are listed in the table on page 47.

Yeast Metabolism
You don’t need a PhD in microbiology to work effectively with yeast. However, recognizing the three phases of yeast activity will help you more effectively understand what to expect from fermentation.
After you pitch, or add, yeast to fresh wort, you can expect three distinct phases:
- Lag phase
- Growth phase
- Stationary phase
Lag Phase
The lag phase is a period of what appears to the naked eye to be total inactivity; it takes place for several hours after yeast is added to fresh wort. But even though there’s nothing to see, the yeast is very much active. The lag phase is similar to changing time zones or elevation: A rapid transition from one environment to another takes a bit of getting used to.
Much of a beer’s character is determined during the lag phase as yeast cells absorb nutrients from the wort and prepare for growth. Most importantly, yeast needs oxygen to effectively prepare for the fermentation to come, which is why we will stress over and over the importance of introducing oxygen into wort before pitching yeast. The lag phase usually takes anywhere from 12 to 48 hours.
Growth Phase
The growth phase is what most of us recognize as “active fermentation.” This is when yeast rapidly consumes sugar and converts it to carbon dioxide and alcohol. It’s also the most visually interesting phase of the fermentation cycle. A thick, fluffy white foam (Kräusen) appears on top of the beer, flecked with brown bits of hops and other wort sediment.
If you ferment your beer in a transparent vessel such as a carboy, you will observe streams of carbon dioxide bubbles rising up the sides during the growth phase, and the airlock will release gas in a seemingly never- ending stream of burps. You may also notice some slight sulfur (rotten egg) aromas coming from the airlock. Some yeasts do this more than others, and it’s perfectly normal.
Stationary Phase
The stationary phase marks the end of fermentation, when activity slows and yeast cells flocculate. Flocculation is the tendency for yeast cells to clump together. When the clumps reach critical mass, they drop to the bottom of the fermentor, leaving behind clear, or bright, beer. Some yeast strains flocculate more than others: British ale strains readily clump together (sometimes to the point of not finishing the job!), while German Hefeweizen yeast likes to remain in suspension. Flocculation is generally considered the end of fermentation, but flavors may continue to evolve for some time.
Yeast Propagation
Yeast propagation is a method by which you can grow larger colonies of yeast from smaller ones. Those small colonies may be a packet of liquid yeast, the dregs at the bottom of an unfiltered commercial beer, or even a sample you receive from your local brewpub. It’s generally not advisable to propagate dry yeast because dry yeast is packed with the nutrients it needs to ferment beer, and it’s better to put those nutrients to work in your actual beer instead of a propagation step. Homebrewers usually call yeast propagation “making a yeast starter.”
A yeast starter is a small volume of wort whose purpose is to give yeast cells an opportunity to reproduce. To make a starter, you prepare low-gravity wort by boiling dry malt extract (DME) with water. You then cool the wort to room temperature and pitch a packet of liquid yeast. Over the course of a couple of days, the yeast reproduces and yields a much larger population than you started with.
Full instructions on preparing a yeast starter are provided in Chapter 12 in the sidebar “How to Make a Yeast Starter,” (page 84).

Moving On
Pitching a large population of healthy yeast cells at the right temperature can make the difference between beer that is just okay and beer that is truly remarkable. Take the time to experiment with both liquid and dry yeast strains, and don’t be afraid to make substitutions if the exact strain you want is unavailable.
Homebrewing is about having fun, so choose the yeast-preparation method that is most fun for you. If you want to geek out on yeast and make a yeast starter, great! But if buying a couple of packs of fresh yeast and calling it a day is more your style, you’re in good company. Increasing numbers of professional brewers do just that.
This is an excerpt from our Illustrated Guide to Homebrewing by Dave Carpenter. Want to read the whole thing? Download it here.